
Installing the Advance Map Block Plugin
How to Install the Advance Map Plugin and Add Multiple Location Markers to Your Map
Before we start:
You need the Advance Map Block plugin code. Look for a .txt file in one of the emails you receive after you purchase a license.
If you haven’t purchased a license yet, please get a license first. And if you already have but can’t find it, email us.
Watch a Video
I. Installing the Advance Map Block Plugin
This section instructs you how to install the Advance Map Block plugin on your Squarespace 7.1 or 7.0 site.
Step 1. Open Website Pages
Click Website from the Squarespace top menu (the menu you immediately see when you open your Squarespace site).
Step 2. Open Website Tools
Scroll down to the bottom of the left side panel and click Website Tools from the Utilities menu to open the website tools menu.
Step 3. Open the Code Injection
Click Code Injection from the Website Tools menu to open the sitewide Code Injection and scroll down to Footer.
Step 4. Paste the Code on the Footer Injection
Copy the code from the .txt file you received via email and paste it on the FOOTER area of the Code Injection.
Step 5. Save the Code
Click the SAVE button on the top left corner of the window to save the Advance Map Block code on your site.
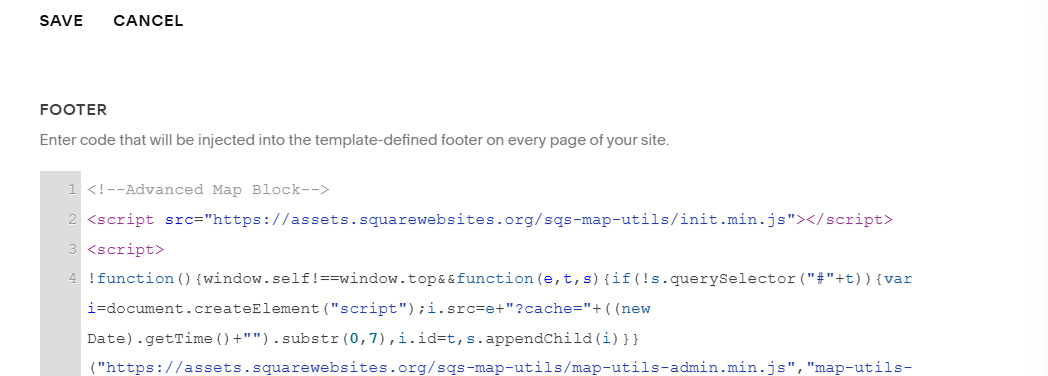
Copy the code from the .txt file in one of the emails you received when you purchase the advance map plugin and paste it in the Footer of the Custom Code settings.
II. Adding multiple markers or map pins to your map block
This section instructs you how to add multiple map markers on pins on your map block and is divided into 2 parts:
II-A. Upload your map marker’s title and location info
II-B. Turn on Multiple Location Setting
Pre-requisite:
You should’ve already installed the Advance Map Block plugin on your site. If you haven’t installed the code yet, check Part I of this tutorial.
There are 2 components in adding multiple map markers:
Data source collection - easiest is to use blog pages.
Map block - where the markers/pins will be displayed.
Important:
If you haven’t added a blog collection yet, add a blog collection because we’ll use the blog pages to contain the location information of the map markers.
II-A. Add map marker title and location info
Follow the steps below to learn how to upload your map marker’s data i.e. the title/name of the marker and it’s location on the map.
Step 1. Add your map marker’s title
The title or name of your map markers (a.k.a. pins) are simply the title of the blog. So to set or change the title of your map marker, simply set or change the title of the blog page.
If this is your first time using the blog page:
Click the blog page in the blog collection list,
Click the EDIT button on the top left corner of the editing window and
Edit the blog title - this will be the title of the map marker.
Step 2. Open the blog page settings
Open the blog page settings by clicking the three dots (…) next to the blog title then click SETTINGS to open the blog page settings.
Step 3. Add your map marker’s location info
Click Location on the settings menu on the left side of the window and enter your map’s location info.
Step 4. Save your map marker’s info
Click SAVE to save your map marker’s info.
Repeat Steps 1-4 to add the title and location to all your map markers.
Same process applies for all your map markers. Just add a new blog page, add your title and your marker’s location info in the Location settings.

Update:
Due to a Squarespace update, the map marker is not saved the first time you add address in the location setting. So you have to add the address twice:
When you add the address and the marker on the preview shows up, move the marker anywhere on the map preview (this will automatically change the address you entered in correspondence to the marker).
Add the address again and make sure the marker is on the right location on the map.
Important:
Make sure you see the map marker on the location preview just like in the image above because this confirms that the address you entered is visible in Google map.
You can also use the auto suggest by typing any part of the address you want to enter and picking it from the suggested addresses.
If you don’t see your address from the suggested addresses, you can click the nearest address and just drag the marker to the exact location.
II-B. Turn on Multiple Location Setting
Follow the steps below to learn how to upload your map marker’s data - the title/name of the marker and it’s location on the map.
Step 1. Open the map block settings
Double click the map block on your page to open the map block settings
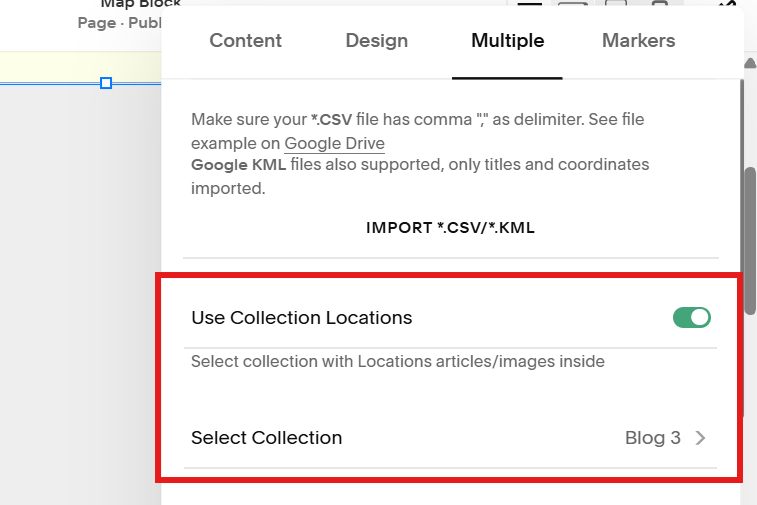
Step 2. Click the Multiple tab
Click the Multiple tab to view the multiple tab settings
Step 3. Turn on Use Collection Locations and select your blog page
Toggle the button next to the Use Collection Locations to enable multiple locations,
Click Select Collection and,
Select your blog page from the list.
Step 4. Save your changes
Click the SAVE button on the upper left corner of the editing window to save your setting changes and test if you see multiple locations on your map.
Open the Map block setting, click Multiple tab, turn on the Use Collection Locations button and select your blog page from the Select Collection list.
Need Help?
-
If you can’t see your blog page from the list, check for the following:
1. Your blog page is published
If your blog page or blog collection is not published, the map plugin won’t be able to locate it.2. Your blog page is not password-protected
If your blog page is password-protected the map plugin won’t be able to access it.
So you have to remove the password.3. Your blog page is not inside a folder
If your blog page is inside a folder, the map plugin won’t be able to locate it.
So take it out of the folder temporarily, select it on the map collection list, then you can place your blogs back inside the folder. -
If you can’t see your blog page from the list, check for the following:
1. You selected your blog from the Collection Location setting
This is a common mistake, people forget to save their changes after selecting their blog from the collection location list.
So check your Use Collection Location setting, make sure that your blog collection is selected and save your map setting.
2. Your blog pages show the map markers in their Location setting
Map markers have to be present when adding your address in the blog pages because this confirms that your address is visible in Google maps.The markers indicates the longitude and latitude info of your address and it tells the map plugin where to place your marker in the map block.
If you don’t see the map markers on the map preview below the Address of the Location setting, enter your address again (see Step 3 of section II-B above for more instructions). -
If there isn't a map street address for a map entry, just enter the closest street address and move the marker to the correct location.
This should automatically update (or fill in) the missing street address.
Closest street address not available?
Then just enter the city and drag the marker to the location by zooming in on the map.
-
Try to re-open the map block settings, close it and open it again.
A Squarespace update from 2024 caused the Advance Map settings to load after the map block settings are loaded instead of loading them together.
Unfortunately, we have no access to the code that was changed so until Squarespace makes the updated code available or changes this in future updates, you’ll have to re-open the map block settings to load the Advance Map menu.
-
Of course, please open this form and tell us about the assistance you need.
QUICKLINKS
Click links to jump to sections.
II-A. Add Marker Title and Location