
Setting Up the Lazy Summary Plugin
******** QUICKLINKS ********
Click links to jump to sections.
Discover the 7 options in the Lazy settings tab and what they do for your summary block
Pre-requisite: You’ve installed the Lazy Summary plugin on your site and have turned it on. If you haven’t done this yet, you’ll find instructions on how to do this here for 7.0 or here for 7.1.
I. Load All or Load More
This section instructs what the ‘Load All or Load More’ option is about and how to use it.

What does this option do?
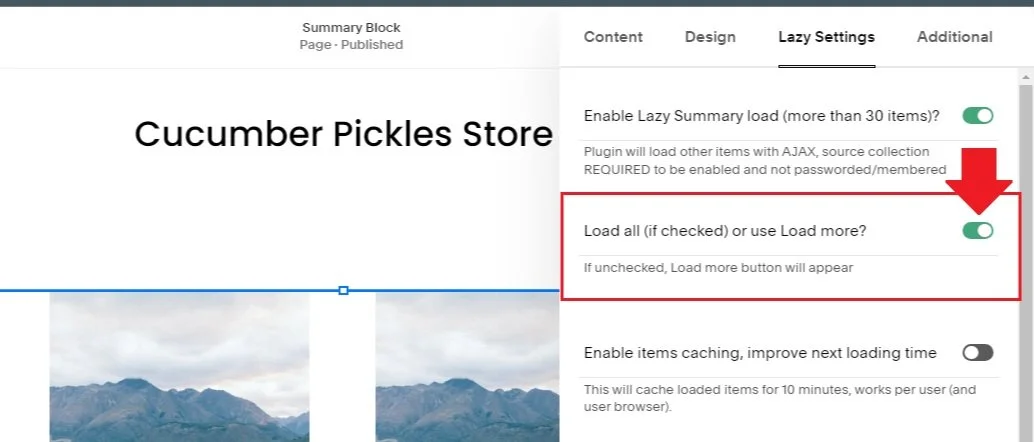
This option lets you load all the items in your collection when turned on, in contrast to the default Load More button. So once, this option turned on, the Load More button will disappear instead, all the items in your collection will be loaded and displayed on the Summary block.
Warning:
Loading all your collection affects page speed, the more items loaded on a page, the more time it takes to load the page. So consider how your page speed before turning this option on.
How to Turn On Load All Option?
Click the button next to the ‘Load all (if checked) or use Load more?’ label to turn this option on.
Green = On while Gray = Off.
The button color will change when clicked,
Another way to activate Load All option.
If you go to the Design tab, you’ll notice that the 30 item limit has been raised to 250. Drag the slider up to max and it’ll activate the Load All option for collections that has less than 250 items.

II. Items number to load
This section instructs what the ‘Items number to load’ option is about and how to use it.

What does this option do?
This option lets you control how many items to load when the Load More button is clicked.
How to Change Items number to load?
There are 2 ways to change the number of items to load.
Option 1. Click the number above the slider and enter the number you want
Option 2. Move the slider to the number you want.
Remember to save your changes or it won’t take effect.


Help: Can’t find the Items number to load option?
If you can’t see the Items number to load in the Lazy Settings tab, check if you have turned on/enabled the ‘Load All’ option. If so, loading all the items hides the ‘Items number to load’ option since it becomes unnecessary because all the items are loaded anyway.
So, uncheck or turn off the ‘Load All’ option then check for the ‘Items number to load’ again.
III. Hide Load More button
This section instructs what the ‘Hide Load More button’ option is about and how to use it.

What does this option do?
This option lets you disable/hide the ‘Load More’ button. And since the ‘Load More’ button is disabled/hidden, users won’t be able to click it. Consequently, the remaining, unloaded items in your collection won’t be displayed - only the items that are loaded initially.
So if you set the "Items to Load” to 15 items, for example, then only the 15 items will be loaded while the rest of your collection is locked up by disabled ‘Load More’ button.
In contrast, if you set the ‘Items to Load’ to max, then the hiding the Load More button becomes useless as this option’s effect is negated.
How to Use the Hide Load More Button option?
Click the button next to the ‘Hide Load More Button’ label to turn this option on.
Green = On while Gray = Off.
The button color will change when clicked,

IV. Load More Button Text
This section instructs what the ‘Load More Button Text’ option is about and how to use it.

What does this option do?
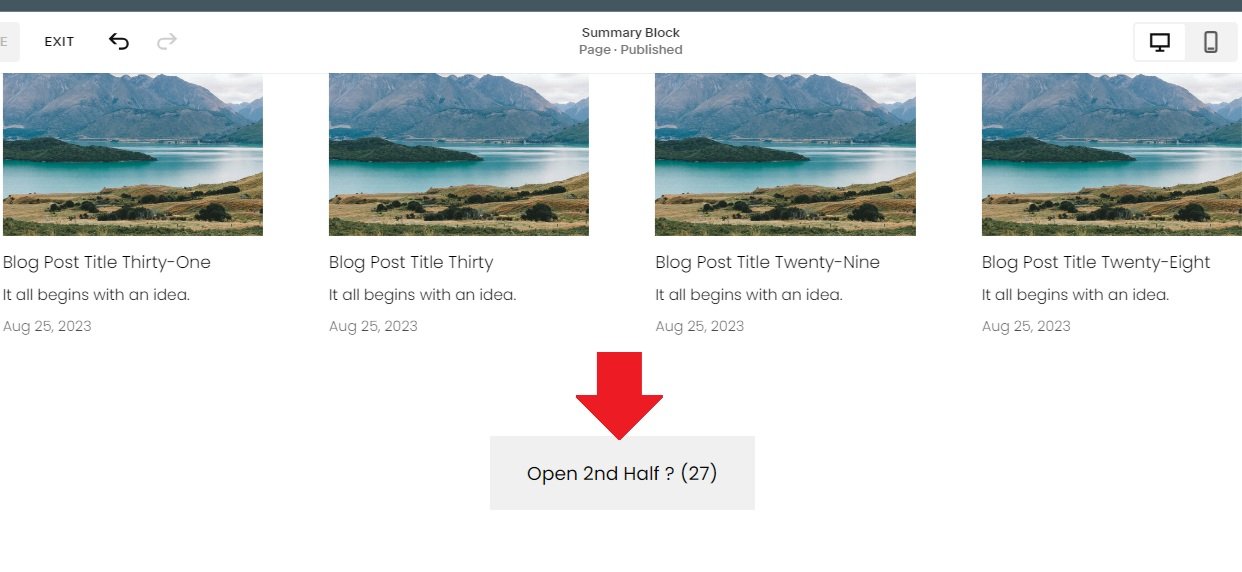
This option lets you change, customize and personalize the name/label of the ‘Load More’ button to fit your site’s style, theme and tone. You can change the text to any letters, numbers and even special characters.
How to Use the Hide Load More Button option?
Click the empty space under the LOAD MORE BUTTON TEXT option and type the name/label that you want to change ‘Load More’ into.

Can I add numbers and special characters on the button label?
Yes, you can add numbers (ex. 12345) and special characters (ex. !@#$%) on your button label.
V. Enable Item Caching
This section instructs what the ‘Enable Item Caching’ option is about and how to use it.

What does this option do?
This option speeds up the loading time of your summary block by storing your site visitors browsing data (images, links, animations, etc.) on their browser cache for 10 minutes so the when they load the summary block for the 2nd or consecutive times it’ll load much faster.
Warning:
You may experience delay with any changes you make on the summary block items (ex. sort, filtered by, etc.) as enabling the item caching option sets the refresh time to 10 minutes.
Also, loading time may vary from user to user since the browsing data is saved on the user’s computer or mobile browser which means it’s affected by the performance of their computer or mobile device.
How to Use the Enable Item Caching?
Click the button next to the ‘Enable items caching, improve next loading time’ label to turn this option on.
Green = On while Gray = Off.
The button color will change when clicked,

VI. Use Squarewebsites.org Server SPEED
This section instructs what the ‘Use Squarewebsites.org Server SPEED’ option is about and how to use it.

What does this option do?
This option is similar to the previous option (Enable Item Caching) which speeds up the loading time of your lazy summary but the difference is that browsing data is saved in our server instead of the user’s browser.
Warning:
Since browsing data is saved on our server, please beware of certain risk that may affect your summary block’s loading time (i.e. server downtime or other server conditions may impact the loading time).
How to Use Squarewebsites.org Server SPEED?
Click the button next to the ‘Use Squarewebsites.org Server SPEED’ label to turn this option on.
The button color will change when clicked,
Green = On while Gray = Off.

VI-A. Cache Time Option
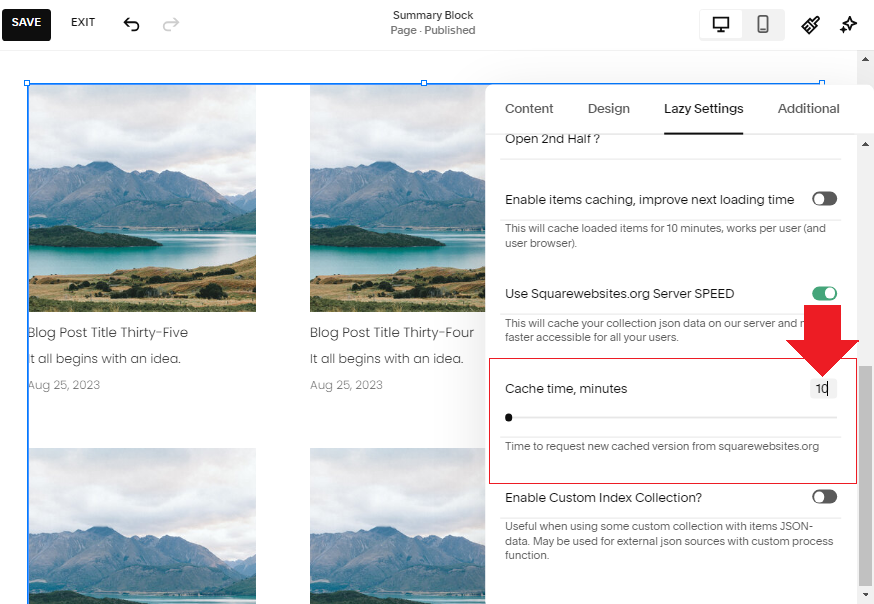
After you enabled the ‘Use Squarewebsites Server’ option, this additional option will be available - set the cache time (in minutes).
What does this option do?
Unlike ‘Enabling Item Caching’ option which has a fixed 10-minute cache time (how long to save your visitors browsing data), this option lets you set the cache time in minutes. So you can choose for the cache time to be shorter or longer.
How to change Cache Time option?
You can change the cache time in 2 ways:
Option 1: Click the number above the slider and enter the time manually.
Option 2: Use the slider and set the marker on the point equivalent to the time you want.
The number and slider are connected so the number responds when the slider is moved and vice versa.

VII. Enable Custom Index Collection
This section instructs what the ‘Custom Index Collection’ option is about and how to use it.

What does this option do?
This an advance option that lets you use/connect a custom collection such as items with JSON-data, external JSON (JavaScript Object Notation) collection or collection with custom process/function.
How to Use Custom Index Collection?
Step 1. Click the button next to the ‘Enable Custom Index Collection’ label to turn this option on.
Green = On while Gray = Off.
The button color will change when clicked,

Step 2. Enter Collection Index URL
This is where you add the URL of your Custom Index Collection. If the custom index collection is within your site you can simply use a forward slash / followed by the URL like this: /my-blog-page.
However, if the collection is external or not from the same site, please use the complete URL including the https://
For example: https://www.mywebsite.com/my-blog-page


Help: I see an Error Message
After you enter the URL of your custom index collection, Lazy Summary will automatically load the collection. However, if the collection URL is wrong or is not compatible (i.e. not compatible with Summary block such as portfolio or index collections) and you’ll either receive an error message or nothing will be displayed at all.
What to do?
1. Check if your URL is correct.
2. Check if your custom index collection is compatible.
3. Make sure your page is visible/published.
